If you’re ready to monetize your content or ads on Facebook, understanding how to set up your payout is essential. Here’s a friendly and easy-to-follow guide that will walk you through the entire process step by step.
Whether you’re a newbie or someone who has been using Facebook for years, this guide is designed to make the Facebook payout setup simple and painless. Grab a cup of coffee and let’s dive in!
1. Why Facebook Payouts Matter?
Before we get into the nitty-gritty of setting up your Facebook payout, let’s take a moment to understand why it’s important.
When you earn money through Facebook (like through Facebook Ad Breaks, Instant Articles, or Stars), you’ll need to set up a payout method so that Facebook can transfer your earnings to you. This is the crucial step to turning your social media hustle into actual dollars in your bank account.
Key reasons to set up payouts:
- You get your hard-earned money transferred securely.
- You can manage your income from Facebook ads, content, or other monetization tools.
- It’s required to access your earnings.
2. Prerequisites for Facebook Payout Setup
Before you jump into setting up your payout method, ensure you have these in place:
- A Facebook account with eligible monetization tools enabled.
- A valid payment method (bank account, PayPal, or others depending on your country).
- Your tax information (especially if you’re in the U.S.).
- At least $100 in earnings to receive your first payout (for some monetization tools).
Got everything? Great! Now we’re all set to start.
3. Navigating to the Payouts Section
Let’s begin by locating where you’ll actually set up your payout details.
- Login to your Facebook Account: Go to Facebook and log in with your credentials.
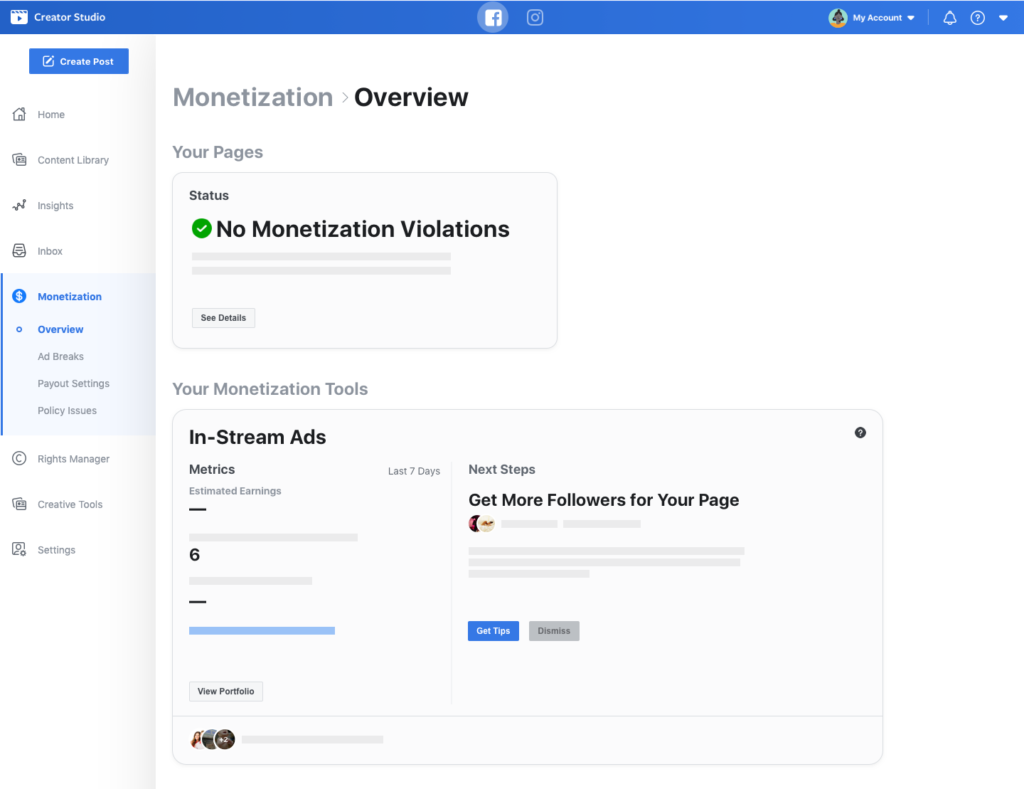
- Go to Creator Studio: Once logged in, click on the little “hamburger” (three lines) icon on the top right, and scroll down to “Creator Studio.” You can also go directly to Creator Studio by visiting Creator Studio.
- Click Monetization: Inside Creator Studio, you’ll see a left-hand menu. Click on “Monetization”. This is where all your earnings info will be found.
- Select Payouts: Under the monetization tab, find the “Payout Settings” option. This is where you’ll manage how and where you’ll receive your money.
4. Setting Up Your Payout Method
Now let’s get into the most important part—setting up how you’ll actually receive your money.
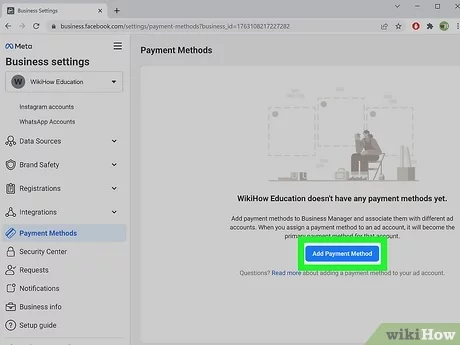
Step 1: Add Your Payment Method
Once you’re in the “Payout Settings” section, you’ll see an option to Add Payment Method. Here are your options:
- Bank Transfer: Facebook will directly deposit your earnings into your bank account. This is the most common option.
- PayPal: If you prefer PayPal, you can connect your PayPal account to receive your earnings there.
You will need to enter your bank account details or PayPal information based on your preferred method.
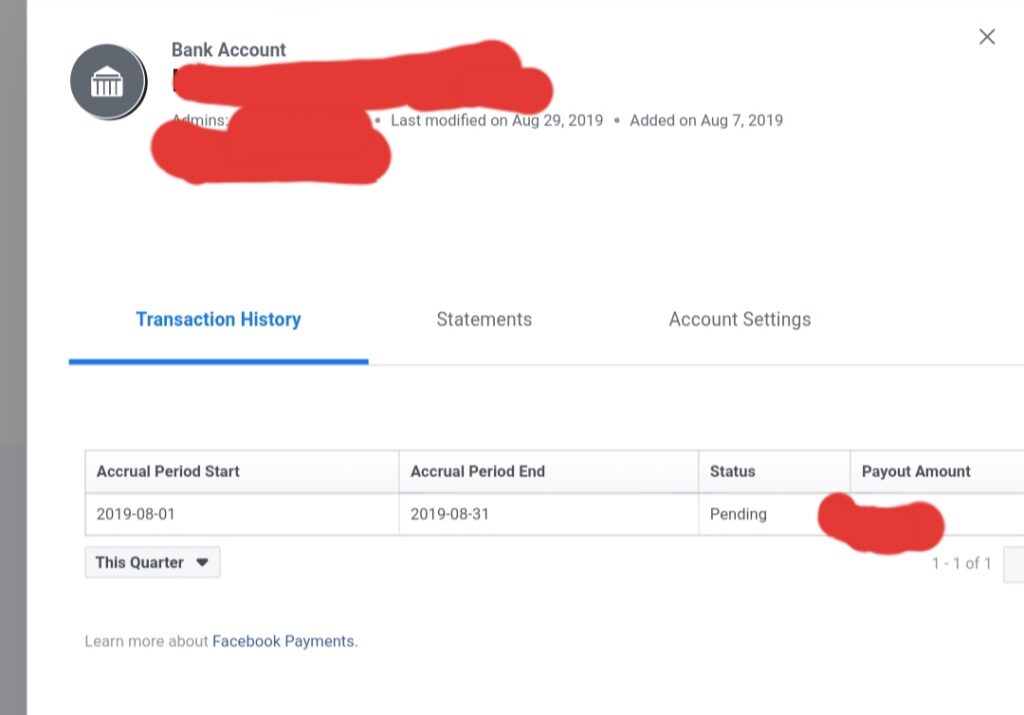
Bank Transfer Method (Brief Overview)
The bank transfer method is one of the most commonly used payout options on Facebook. Here’s how it works:
- Direct Deposit: Facebook will transfer your earnings directly into your local bank account.
- No Middleman: Unlike PayPal, there’s no third-party platform involved—your money goes straight from Facebook to your bank.
- Processing Time: Bank transfers can take 1-5 business days, depending on your country and bank.
- International Transfers: If you’re outside the U.S., you’ll need to provide your IBAN (International Bank Account Number) or SWIFT/BIC code for international transfers.
This method is secure, reliable, and often preferred by creators who want to avoid additional transaction fees associated with other platforms.
Step 2: Enter Tax Information (if required)
Facebook requires some tax information to be able to pay you, especially if you’re based in the U.S. For non-U.S. users, the tax information process may vary.
- Fill out your W-9 form (for U.S. citizens).
- Non-U.S. citizens may need to provide a W-8BEN form.
- Depending on your country, Facebook will guide you through this process. It’s quick and easy.
Tax Form for Non-U.S. Citizens
If you’re a non-U.S. citizen, you’ll typically need to fill out the W-8BEN form for tax purposes. Here’s a quick breakdown:
- Purpose: The W-8BEN form certifies that you are a foreign individual receiving income from U.S. sources (like Facebook), and it helps you claim a reduced tax rate or exemption based on a tax treaty between your country and the U.S.
- What You’ll Need: Basic personal information, such as your name, address, country of residence, and a Tax Identification Number (TIN).
- Why It’s Important: Filling out this form ensures that Facebook withholds the correct amount of taxes from your earnings. Without this form, you may be subject to a default withholding rate of 30%.
This form is crucial for ensuring you comply with tax regulations while receiving payouts from Facebook if you’re outside the U.S.
Step 3: Review Payment Thresholds
Facebook typically has a minimum payment threshold of $100. This means you won’t receive a payout until your earnings reach at least $100.
Check out if your payout method has any additional fees or thresholds specific to your region or platform.
Step 4: Set Up Payment Schedule
Now, decide how often you want to get paid. Facebook usually issues payouts once a month, but you can select specific dates or frequencies if you wish.
- Monthly: The default option, paid on a specific date each month.
- Threshold Based: Once your earnings cross a particular threshold (e.g., $100), you get paid.
Confirm your preferences, and Facebook will automatically pay you according to the schedule.
5. Verifying and Securing Your Payout Setup
After you’ve entered your payment information, it’s crucial to double-check and ensure everything is correct.
- Verification Step: Facebook may ask you to verify your payment details. You might receive a small test deposit into your account that you’ll need to confirm.
- Security: To ensure the security of your payouts, Facebook recommends enabling two-factor authentication on your account.
6. Understanding Payouts and Earnings
Once you’ve set up your payout, here’s how you can track your earnings:
How to View Your Earnings:
- Head back to Creator Studio.
- Click on Monetization and then select Payout Settings.
- You’ll see a breakdown of your earnings and details on when your next payout will be.
Common Reasons for Payout Delays:
Sometimes, payouts may be delayed. Here are a few reasons why:
- Your earnings haven’t reached the $100 threshold.
- There may be a delay in verifying your tax information.
- Issues with the bank or payment platform.
If this happens, don’t worry! You can always contact Facebook support through the Help Center to resolve any issues.
7. Maximizing Your Facebook Earnings
Now that you’ve set up your payouts, the next step is to focus on maximizing your earnings. Here are a few tips to help you boost those numbers:
Tip 1: Create Engaging Content
Facebook rewards content that keeps people engaged. Whether you’re posting videos, articles, or live streams, aim for high-quality, engaging material that resonates with your audience.
Tip 2: Use Facebook’s Monetization Tools
Make use of Facebook’s features like Ad Breaks, Fan Subscriptions, and Stars. These tools are designed to help you generate more income from your content.
Tip 3: Consistency is Key
The more you post and engage with your audience, the higher your earning potential. Regular content helps keep your followers engaged and brings in more ad revenue.
Get Paid Easily!
Setting up Facebook payouts might sound technical, but it’s actually a pretty straightforward process. By following these simple steps, you’ll be on your way to receiving your earnings and turning your Facebook content into a steady income stream.
So, go ahead, finish setting up your payout method, and start focusing on creating more awesome content!
Now you’re all set to manage and receive your Facebook payouts. What’s next on your journey to success?